


When the stove’s pellet function fails to ignite, it may be due to several reasons.
For proper ignition and sustained burn, the stove requires three essential elements:
- A functioning igniter to generate ignition heat.
- Properly working augers to deliver the right amount of pellets to the burning cave.
- A fan to supply enough air for combustion.
It is important to ensure that no ash is blocking the air pathways or obstruct the flow of new pellets to the burning cave. If these three elements are present and functioning correctly, then a failed ignition may be caused by insufficient chimney draft. To check the draft, heat the chimney with small wood sticks before turning on the stove's pellet function.
We recommend the following procedure:
Step 1
Start by cleaning under the burning cave and the hole of the igniter (on the left side) for ash and leftover cinders/slags. After prolonged use, the ash can become hard and block the igniter hole, both externally and internally, preventing proper ignition of the pellets. Inspect both areas. You may need to use a sharp metal part e.g. a screwdriver to loosen hardened ash and soot. See pictures below:
Before cleaning After cleaning
Step 2
Turn the stove on and check if the hole for the igniter becomes red/glows after few minutes (see picture below).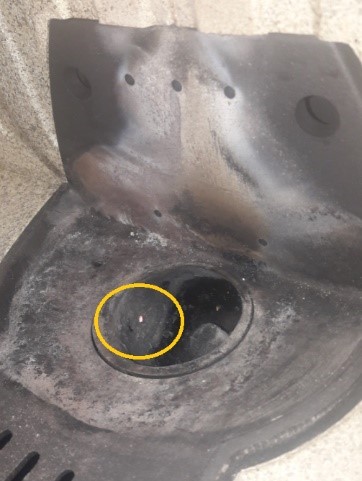
If you have cleaned for ash waste and it does not glow, the igniter is either defect, or the cable is not properly connected. Check for both.
- Remove the square cover located on the left side of the stove (see picture 1 below) to find the igniter.
- Check if the wires are properly connected (picture 2) and ensure there is no pellet waste in the hole where the igniter is placed or inside the igniter itself (picture 3). When inserting the igniter, push it all the way in, then pull it back by 1 mm.
- Turn on the stove and check if the igniter glows. If it does not glow, replace it with a new one. If the igniter glows but the stove still fails to ignite the pellets, read step 3 in this guideline.

Picture 1: Remove the square cover which is placed on left side.
Picture 2: Check if the wires are correctly connected.
Picture 3: Check for pellet waste in the igniter tube.
Video: This video shows how easy it is to find and replace the igniter and how the wires should be connected:
Step 3
Air and draft are essential for proper ignition. You can hear when the fan is working, but you can also test if it works properly by holding a piece of paper in front of the fan nozzle and check if the paper is being drawn towards the fan. Measure the draft to ensure that it reaches the required 12 PA when stove and chimney is cold. You can heat up the chimney with small wood sticks and turn on the stove once it is heated. If this helps the pellet ignition, it indicates that the chimney draft is insufficient. The Aduro Draft Optimizer will solve your draft problem, which should resolve the ignition problem.
Step 4
If the ignition still does not work, even after the stove is cleaned, the igniter is glowing and functional, and the draft and fan are working, the problem may be caused by one of the following factors:
- There may not be enough pellets at the top of the burning cave. Fill up with pellets and turn on the stove again. Make sure there are enough pellets in the pellet container, as pellets may sometimes settle at the edge, preventing the auger from reaching them. Also, check the amount of pellets underneath the burning cave. Visible pellets may not always be sufficient. If both augers are functioning properly, it should be possible to create a pile of pellets. Try forming a pile the size of a molehill. If you cannot, one of the augers is not working correctly.
- If new pellets are not reaching the burning cave, even when the pellet container is full, you must examine the gear motors and both augers. Examine if the augers are rotating by pressing and holding down the “auger logo” button on the control panel of the stove. Listen for the sound of the augers turning. Observe the auger in the burning cave. To view the other auger end, remove the backplate of the stove. Look at the metal nut, to check the turning direction.
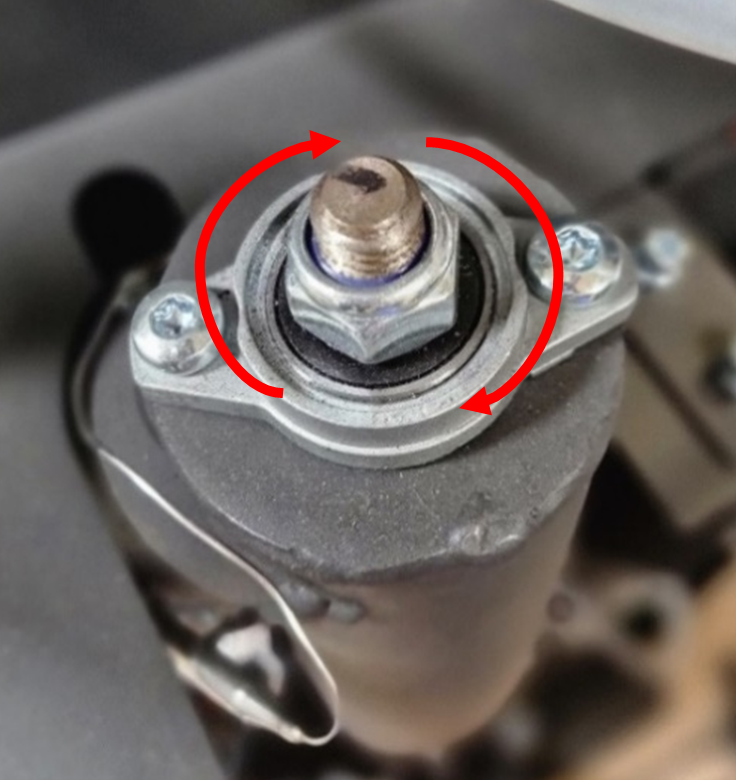
Both augers must rotate clockwise. If they are not turning, check if the cables are properly connected from the motor to the clamps.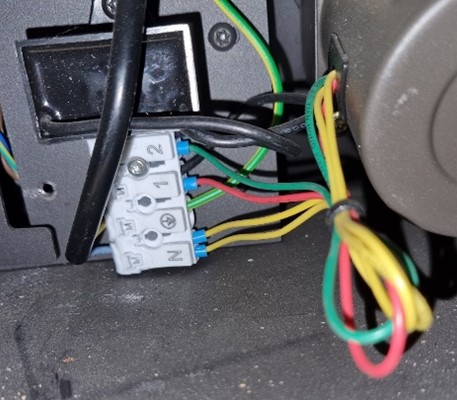
If the cables are connected correctly but the motors will not turn, please contact a qualified craftsman to troubleshoot the stove's electronics.
Electronics check, only for advanced users permitted by Aduro:
In rare cases, the control board may be defective, causing a gearmotor to malfunction, resulting in insufficient pellet supply to the burn chamber.
Before accessing the control board, turn off the power.
- Access the control board by unscrewing the two screws (see picture 1 below).
- Pull the control board out slowly, while making sure not to damage the cables or board.
Make sure the board is not in contact with the stove to prevent any electrical connection to the stove's chassis.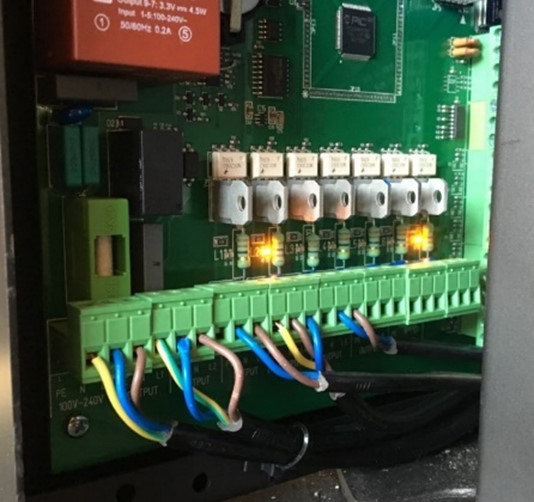
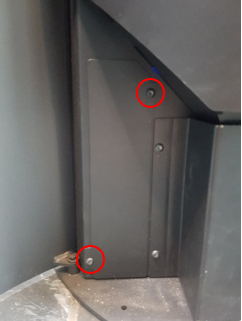
Picture 1: Unscrew the cover to reach control board
Picture 2: Control board
- Supply power to the stove again.
The control board has several inputs (L1-L7), each with its own LED indicator that lights up when the corresponding input is activated.
- Turn on the stove (try to perform an ignition).
- Check if the L4 LED is on during the ignition phase, as the igniter should be turned on.
- Check if the LED for inputs L1 (long auger gearmotor) and L3 (short auger gearmotor) light up during the igniting of the stove.
If the board does not perform as expected, it probably needs to be replaced. Please contact a qualified craftsman, to replace the board.