


Difficulty level: Easy
Time consumption: 15 minutes
Components: Device (Android or iOS), Wi-Fi or ethernet connection, Wi-Fi antenna
This guide will take you through the entire process of installing the Aduro Pellet Stove app, creating an account, and connecting your stove to your Wi-Fi to enable remote operation of your Aduro pellet stove.
Setting up an account and logging into the app:
1. Open “Google Play Store” (Android) / “App Store” (iOS) and search for “Aduro Pellet Stove”. Or use one of the following links:
- Android: Aduro Pellet Stove - Apps on Google Play
- iOS: Aduro Pellet Stove on the App Store (apple.com)
2. Press the ‘install’ button. When it has been installed, you can open the app
3. Press ‘create an account’. Read and accept the general terms and conditions to continue.
Register by entering your email and creating a password.
You can also choose to sign in with Google, Facebook, or Apple. However, if you want to control your stove from different devices, it is necessary to create an account.
Once your stove is connected to your account you can control it from any device by signing in with the login details of your account.
4. You will be asked to prove that you are not a robot. Follow the instructions and verify.
After verification, you will receive an email from support@wappsto.com asking you to confirm your email. Check your spam folder if you cannot find the email in your inbox.
5. Enter your email and password (login details of your newly created account) and sign in. Other people in your household who may control your stove need to use the same login details on their device.
6. Before adding your stove, make sure both Bluetooth, Wi-Fi, and Location are enabled on your device.
Adding a stove to the app:
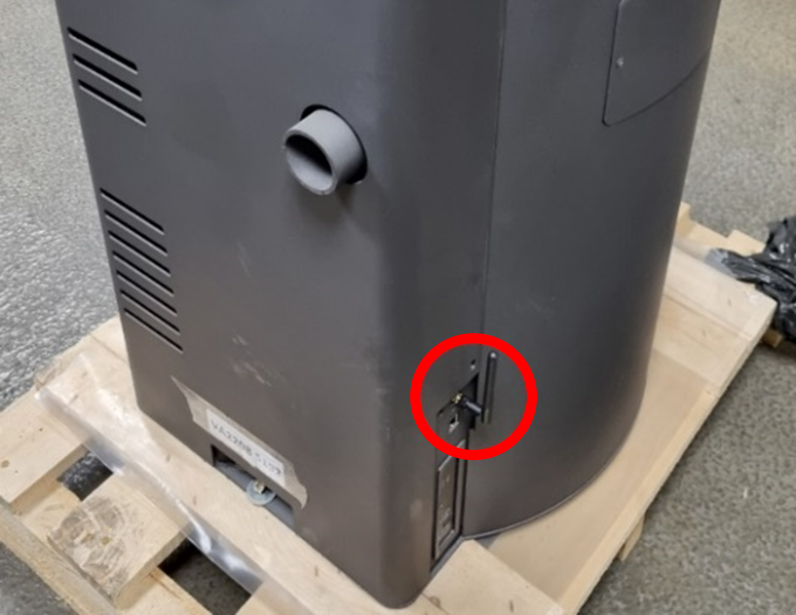
Before beginning the setup of your stove in the pellet stove app, please make sure that the Wi-Fi antenna that comes with the stove is mounted correctly:
1. Press “Add stove” or “+” in the app.
2. Choose one of the following options:
- Choose “Connect stove to Wi-Fi” if you want to search for a stove nearby (then go to section 2A below)
- Choose “Use ethernet cable” if you want to connect by using the ethernet cable (then go to section 2B below)
2A) Select the stove where the UUID matches the number on the label on the back of your stove. The stove will now start searching for available Wi-Fi networks. Select the network you want the stove to connect to. If your network does not appear on the list, try searching again or go to the manual setup. Enter the Wi-Fi password and press “configure” to continue:
2B) When connecting to the stove using the ethernet cable, you need to type in the UUID or scan the QR code on the label on the back of the stove:
3. Please answer whether your chimney is equipped with a smoke exhauster before continuing. Press “Save and continue”. Now fill in your contact information. The email must be the one you used to sign in with.
Once you save the information, your stove is connected to the Wi-Fi and can be controlled via the Aduro Pellet Stove App. Press ‘Go to the stove’ to access your stove.
4. Your stove now appears on the home screen of the app. As long as you sign in with your account, you can control the stove from any device (smartphone or tablet).
Troubleshooting
Connection problems often relate to the stove’s Wi-Fi module. This can be located on the back of the stoves (see below):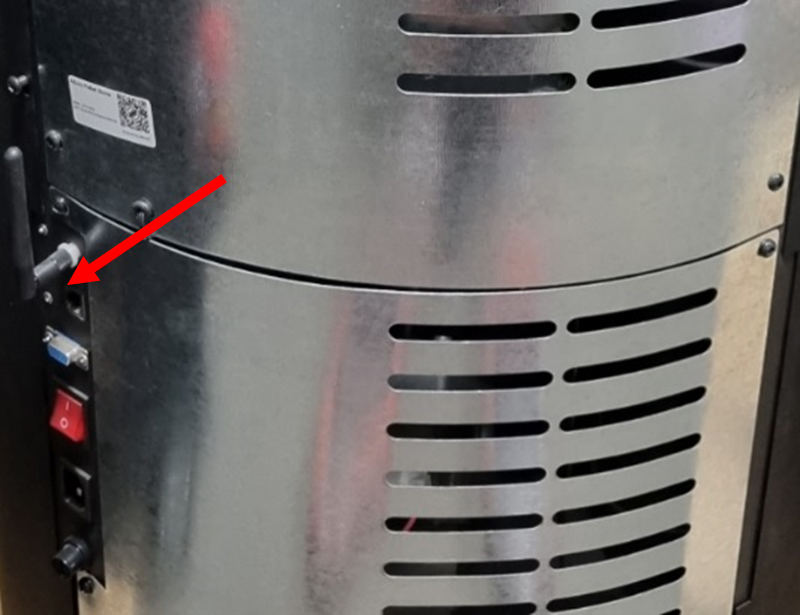
Stove is not showing in list of devices:
- Make sure that the Wi-Fi module is turned on (the LED on the module should light).
- Make sure that the Wi-Fi module is connected to the control board:

Wi-Fi is not showing in list of available networks:
If the Wi-Fi does not show up in the list of available networks, this can be caused by several errors:
- Wi-Fi name: Wi-Fi names containing special characters (!,&, % etc.) and spaces can cause issues as the stove cannot always recognise these. We recommend trying to change the Wi-Fi name to something simple (for example “mywifi”) and max 10 characters to see of this is the cause.
- Make sure a 2.4 GHz network is available: The stove’s Wi-Fi module can only work with a 2.4 GHz connection. Many newer network routers might only produce a 5 GHz signal as standard and need to have the 2.4 GHz signal activated. Other routers might produce separate signals. Look for one labeled with 2.4 GHz.
- Make sure router and stove are turned on.
- Restart the router and stove: Sometimes a simple restart is all that is needed.
- Restart phone and app.
- Restart the stove.
- Reinstall the app, and make sure that the newest version is installed. The newest version can be seen in the phone’s app store.
- Make sure there is a stable Wi-Fi connection that the stove is connected to.
- Try to reconnect the stove to the Wi-Fi through the setup wizard.
- Make sure that the Wi-Fi module is turned on and that it is lighting green. If it lights red, perform a factory reset of the internet module, by following the factory reset procedure described here.