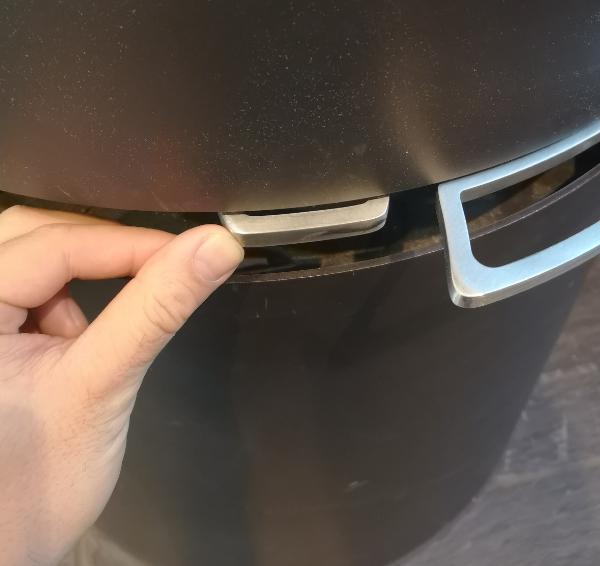
Our experience has shown that there are several factors that can cause pellet accumulation in the brazier. Most often this is because the stove does not get enough air supply. There must be a proper mixture between the combustion air supplied and pellets supplied. Therefore, most problems with pellet accumulation are solved by improving the air supply or the draft in the chimney. Therefore, we recommend that you start by checking the following things:
- The damper for the air for the pellet stove (the little black damper) is 100% open (see picture below). It is very important that this damper is fully open, i.e. pulled completely out.

- The grey air damper for wood, which controls primary, secondary and tertiary air supply must always be closed when you burn in pellet mode.
- Check that the small inspection cover for the air chamber is placed correctly (see picture 1). The squared cover is located under the isolation stones inside the burning chamber of the stove.
Picture 1: Door is placed correct Picture 2: Door is not placed correct
- Check that the rubber plug located on the igniter is mounted correctly. See picture below:

- The door must be tight. Use a thin piece of paper and carefully pull it out. There must be some resistance when paper is pulled out. If there is none, then door or gasket needs to be adjusted.
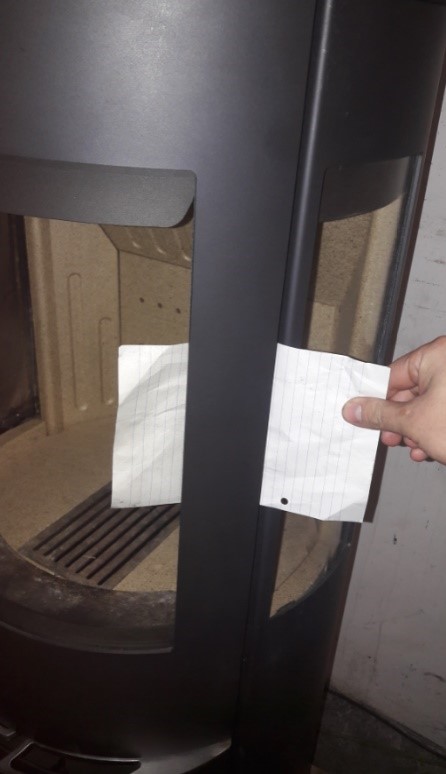
If the above mentioned is followed and you still have problems with pellet accumulation, we recommend trying the following 6 solutions (starting with no. 1 and moving down the list):
1. Insufficient cleaning can be a reason for pellet accumulation. Clean under the brazier as described in the Hybrid manual and in this FAQ. The stove is not intended to run continuously for several days without a short cleaning. We recommend a quick cleaning, in which you scrape the ash under the brazier into the grate (takes 1-2 minutes). It is important to conduct this cleaning for every 13 kg of burned pellets (1 silo capacity), which is approximately the same as 8 hours in operation on heat level 3, 12-14 hours level 2 or 20-24 hours on heat level 1. See the following video on how to conduct the daily 2-3 min long cleanings (from minute 08:05 in the video):
Pellet stoves form dust in the stove and air pathways. The amount depends on the pellet type and how much you burn. Much of this dust is burned when the stove is used in wood mode because the temperature is higher. Depending on the use, it is necessary to clean the stove at the top of the combustion chamber. Carefully remove the fireproof tile in vermiculite on the left, remove the baffle plate in vermiculite, and vacuum clean the upper part of the stove and above the baffle plate in steel.
2. Make sure the stove gets enough air for the combustion. If it is placed in an airtight room, it may be necessary to install external fresh air pipe into the stove. An extractor hood and ventilation system can take some of the air from the Hybrid stoves. Check that the stove’s fan, which is placed behind the stove, is working properly. Hold a thin paper to see if it sucks the paper in. You have the possibility to buy an Aduro Air booster (stronger fan), which can deliver over 30% more airflow to the stove (see step 4).
3. The quality of the pellets plays a crucial role, and it is therefore important to try different pellets if you experience pellet accumulation. We recommend 6 mm bright pellets, 5 Kwh, of a good quality that are easy to break. The pellets should be stored in a dry place and have a humidity of <10%.
4. Measure the chimney draft, which plays a crucial role for a good pellet combustion. The stove needs to have 18-25 pascal when its hot (1 hour in operation), otherwise it can lead to bad pellet combustion and pellet accumulation. If your stove does not produce this draft, we recommend installing a DraftOptimizer or an Aduro Air booster.
An Aduro Air Booster delivers more air into the stove and can therefore improve combustion when the stove is connected to a chimney that does not have a proper draft. You have the option to purchase an Aduro Air Booster (stronger fan) capable of delivering over 30% more air supply for the combustion. The Aduro Air Booster is easy to install as you replace the existing fan. Due to the heavier air supply the Aduro Air Booster makes slightly more noise than the standard fan, but the sound is still lower than most ordinary pellet stoves. Aduro Air Booster can be ordered from our webshop. The video below shows the assembly:
If the chimney is too short (it is important that the chimney is 40 cm above the roof of the house), too poorly insulated, with several cracks on the fluepipe, with an uninsulated flue pipe over 2 meters, then we recommend installing an Aduro DraftOptimizer (exhaust fan). Aduro DraftOptimizer can be ordered from our webshop.
5. Adjust the hybrid stoves settings. See the instructions below. Adjusting the settings correctly can solve the pellet accumulation issue completely.
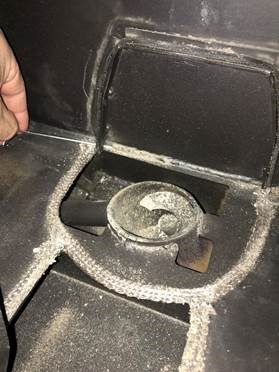
6. Check the cast iron grate and the brazier. There must be no leakages between the grate and the cast iron brazier. If there is too much space or too big “holes” like shown on the picture below, it is a defect brazier. Remove the fireproof tiles at the bottom of the combustion chamber and check the bottom of the cast iron grate. The gaskets must be placed correctly to ensure that there are no leakages between stove and grate. If there are any leakages, these can be pointed with a heat resistant joint filler.
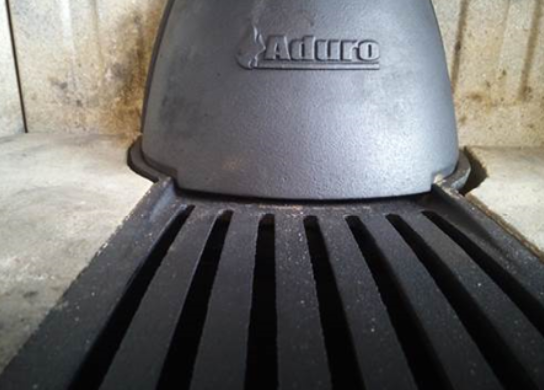
In some cases, leakages around the cast iron grate can occur. Therefore, we recommend that you control the grate for any leakages and fix them. Leakages in the corners may lead to bad combustion and pellet accumulation. See pictures below:
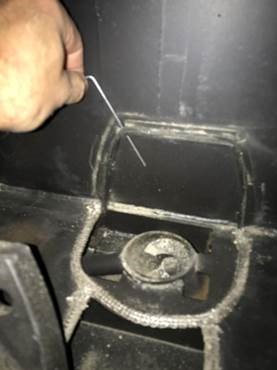
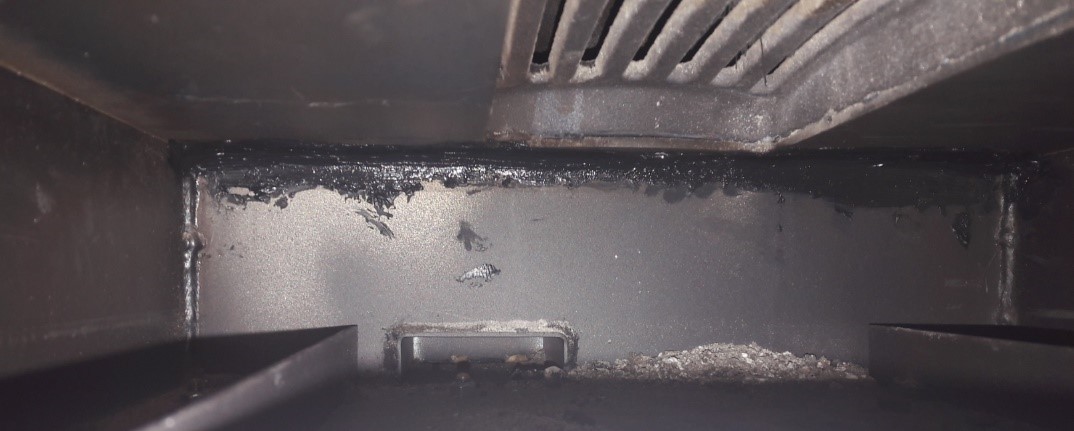
7. Take out the ash pan and see if there is a crack at the end of the wall, where undesirable air can penetrate. Use heat resistant sealant to seal, as shown in the picture below, if there is any crack.
If the above-mentioned doesn’t improve the situation, please contact your dealer for further assistance or fill out a claim at our website.
Guidance for how to adjust the stove's settings
In the Hybrid app, you can change both the auger (pellet volume) and fan speed (air for combustion). Tap the logo with the gears at the front of the app so you get to the app's function page, and at the bottom you will see that it says "adjustment".
If you experience pellet accumulation at heat level 3 with factory settings (see table below), then we recommend changing the stove’s settings (lowering the auger speed and increasing fan speed) and performing a new test, using only the heat level function. You should not use any of the other 2 functions "Timetable" and "Wanted room temperature" when testing the stove. Select heat level 3, set the auger to speed to 32% and the fan speed to 90% to test how many hours your stove can burn until pellet accumulation occurs (make sure to clean under the brazier before starting the test). The stove should as a minimum be able to burn for 7-8 hours without accumulation. Then, you can test level 1 and 2, maintaining the auger speed of 15% and 21%, which is the factory settings for these two levels, and only change the fan speed and set it to max air.
If this improves the situation, then we know that your stove just needed more air supply. You then have the possibility to buy and install an Aduro Air booster for even more airflow.
| Factory settings | Level 1 | Level 2 | Level 3 |
| Fan | 40% | 55% | 80% |
| Auger (pellet quantity) | 20% | 25% | 35% |
| Possible adjustments | Level 1 | Level 2 | Level 3 |
| Fan | 15-50% | 20-70% | 50-90% |
| Auger (pellet quantity) | 13-20% | 18-32% | 32-45% |


